Turn any spare wall into a guest room—no contractor required.
1️⃣ Introduction to DIY Murphy Beds
Why do you want to know How to Make a Murphy Bed from Scratch? Here’s why,
You need an office and a guest room, but you only have one wall. The Murphy bed Your full-size mattress that effortlessly folds away into a sleek cabinet, instantly reclaiming your space for 364 days a year. Buying a pre-built unit can run $1,500–$3,000; building your own costs $300–$600 and takes a single weekend once you know the steps.
At the end of the article, we have another article where we discuss which mattress is best for a Murphy bed. Keep Reading. ENJOY 🙂
2️⃣ Murphy Bed Design Options
📐 Vertical vs. Horizontal Murphy Beds – Which Is Easier to Build?
| Vertical (up & down) | Horizontal (side flip) |
| • Most common plans online | • Great for low ceilings (5 ft) |
Beginner pick: Vertical—plans and hardware kits are everywhere, and the math is simpler.
🗄️ Cabinet vs. Simple Wall-Mounted – Differences in Complexity
- Cabinet Style
– Looks like built-in furniture
– Adds $150–$300 for plywood and trim
– Requires basic cabinet-making skills (pocket holes, edge banding) - Wall-Mounted Frame Only
– Mattress sits in a bare metal/wood frame that flips up
– Faster build (one afternoon)
– Exposed hardware—fine for garages, studios, or minimalist vibes
🛠️ Fold-Down Desk or Shelving – Multi-Functional Designs
- Desk front: The face panel drops to become a desk; bed folds over it.
- Bedside Library Walls: Floor-to-ceiling bookshelves hug the bed’s sides, disguising the frame and doubling as a functional book haven.”
- Pro tip: Build the desk first; the bed face simply becomes the underside of the desktop.
3️⃣ Essential Tools & Materials Needed
🔨 Tools (no table saw? No problem)
- Power drill/driver
- Circular saw or jigsaw + straight-edge guide
- Pocket-hole jig (Kreg R3 is $30)
- Level, stud finder, tape measure
- Socket set for the piston bolts
📦 Materials Checklist (Queen Vertical)
| Item | Purpose |
| ¾” plywood (4 sheets) | Cabinet carcass & face |
| 2×4 SPF lumber (8×8 ft) | Inner frame & legs |
| Murphy bed hardware kit (Amazon ~$120) | Pistons, hinges, fasteners |
| 2 Inches wood screws and need 1 ¼” pocket screws | All joints |
| Edge banding or iron-on veneer | Clean cabinet edges |
| Wood filler + paint/stain | Finish to match room |
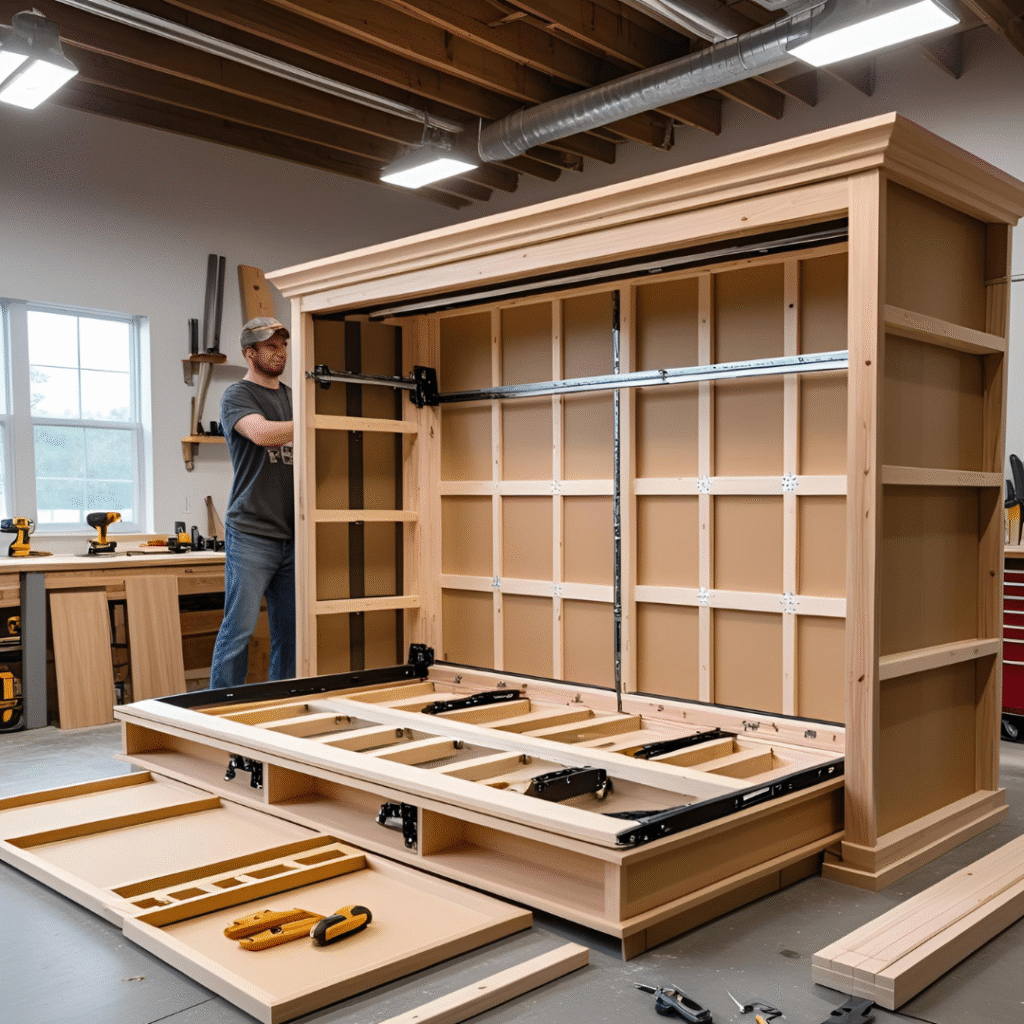
4️⃣ Step-by-Step DIY Murphy Bed Construction
📏 Step 1: Measure & Mark the Wall
- Find two studs 60″ apart (queen width).
- Mark 18″ off the floor for the bottom of the mattress box—gives 10″ clearance when folded.
🔧 Step 2: Build the Inner Frame
- Cut four 2×4 rails: two at 80″ (length) and two at 60″ (width).
- Pocket-screw into a rectangle; add one center support at 40″ to prevent sag.
🔩 Step 3: Install the Hardware Kit
- Pistons: Bolt the lift arms to the inside of the side rails—arrow faces up or the bed won’t stay closed.
- Pivot brackets: Screw into wall studs first, then hook the frame. Use a helper—it’s awkward solo.
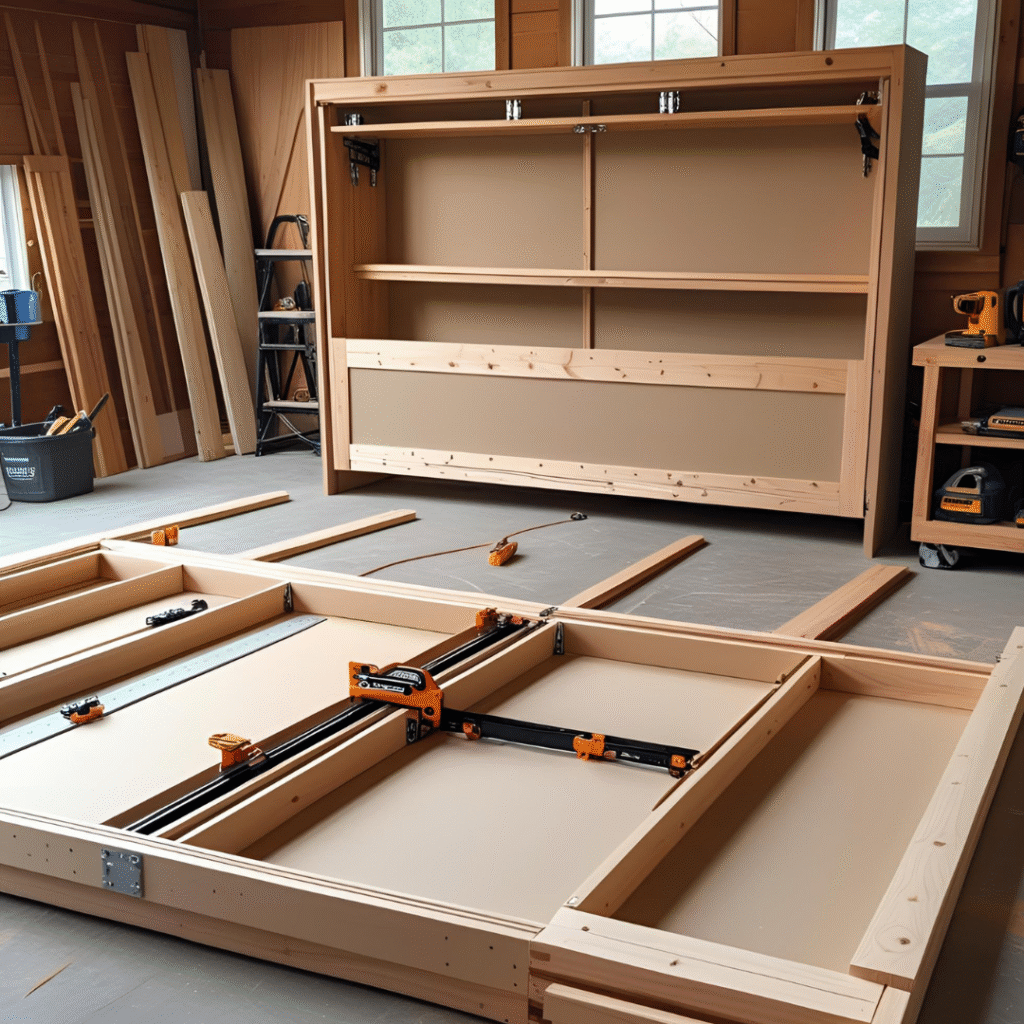
🪚 Step 4: Add the Mattress Box
- Face the underside, sides, and foot end with ¾” sheathing, creating a rigid box structure.
- Keep the top uncovered to allow airflow, preventing moisture buildup when the mattress is stowed.
🎨 Step 5: Build & Attach the Face Panel
- Frame a 65″×45″ rectangle out of 1×6 pine.
- Add decorative bead-board or painted MDF for a finished look.
- “Convertible Shelf-Desk: Mounted on hidden hinges, the bottom shelf swings down to reveal a built-in desk surface—tucking away cleanly when not in use.”
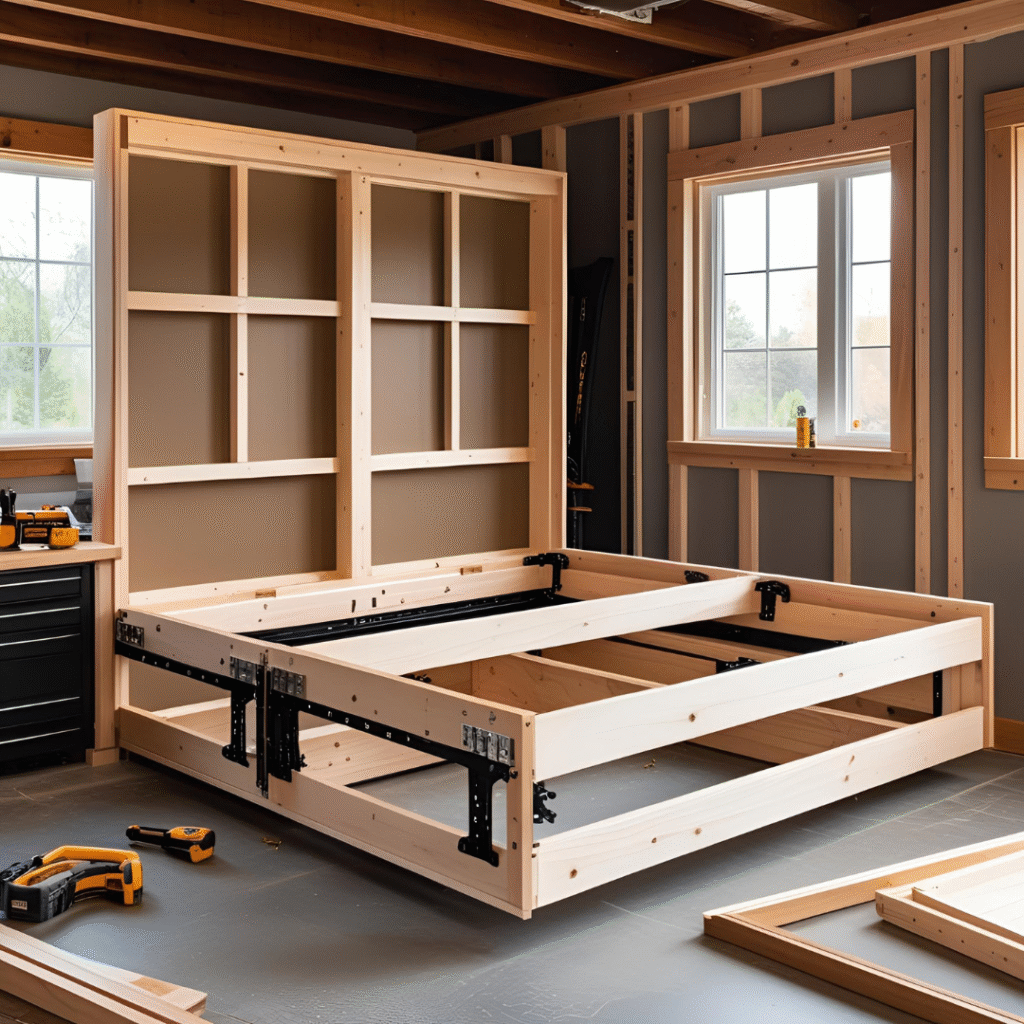
🛏️ Step 6: Safety & Finish
- Legs: Hinged 2×4 legs swing down effortlessly when the bed lowers, locking securely into place with ¼” dowel pins for rock-solid stability.
- Child lock: Simple barrel bolt on the side rail keeps toddlers from unfolding the bed.
5️⃣ Common Mistakes to Avoid
🚫 Skipping the Stud Finder
Drywall anchors alone will rip out. Always bolt into at least two wall studs.
🚫 Wrong Piston Orientation
If the piston arrow faces downward, the bed will launch open violently. Always verify orientation against the kit schematic before final assembly
🚫 Forgetting Clearance for Baseboards
Notch or remove ¾” from the baseboard behind the frame—skip this, and the bed will tilt forward, refusing to latch shut.
🚫 Using MDF for the Frame
MDF splits under shear forces. Stick to plywood or 2× lumber for the load-bearing parts.
🚫 Painting Before Final Assembly
Paint the face panel last; you’ll scuff edges while wresting the frame onto the wall.
🏁 Final Word
Transform any room with a sleek, disappearing bed—built in just 48 hours for under $400. With one hardware run and basic tools, you’ll craft a sturdy fold-up bed that tucks away effortlessly, freeing up your office, gym, or studio.
Pro Tips:
- Precision matters: Measure twice, bolt into studs.
- Let physics help: Gas pistons handle the weight.
- Breathe easy: Open-top design prevents moisture.
- Dual function: Drop-down panel becomes a desk when needed.
No more sacrificing your space—just smart, functional design.
The Genuine Tips + Maintenance, where actually you can find D.I.Y Murphy Bed Plans?
🛠️ Final Tips & Maintenance Cheat-Sheet
Keep your DIY Murphy bed folding like butter for the next decade.
🔧 Routine 5-Minute Check-Up (every 3 months)
- Regularly check and tighten piston arm and wall bracket bolts—constant motion can work them loose over time.
- Lubricate hinge pins it’s important lubricate them with few drops of 3-in-1 oil. Don’t forget to wipe excess to avoid carpet stains.
- Vacuum the cabinet floor to stop grit from gouging the mattress cover.
- Test safety latch—if it pops open too easily, bend the spring tab back 1 mm.
🧽 Mattress TLC
- Air-out cycle: After every guest, leave the bed down for 30 min with a ceiling fan on—prevents “closet” smell.
- Spot clean only: Act fast with a barely-wet soapy cloth, carefully avoiding contact with unfinished plywood edges where water penetration could cause swelling.
- Rotate mattress 180° every 6 months so the same edge doesn’t bear weight when vertical.
🎨 Refresh the Finish
- Touch-up paint pen matches cabinet color from any big-box store; keep one in the junk drawer for dings.
- Paste wax on the cabinet face once a year keeps fingerprints from sticking.
📍 Where to Find Rock-Solid DIY Murphy Bed Plans
| Source | What You Get | Best For | Price |
| Instructables DIY Modern Murphy Bed | 12-step photo guide + video + printable cut list | Visual learners | Free |
| D.I.Y Pete –Building a Murphy Bed | Hardware-kit walk-through + YouTube demo | First-time kit buyers | Free guide / kit Paid |
| Lori Beds | Strap-free, spring-free plans + $200 discount | Beginners who hate pistons | Plans $0 / kits Paid |
| Family Handyman – Bookcase Murphy Bed | Full magazine article + cut diagrams | Storage combo builds | Free w/ email |
| Create-A-Bed Video Series | 20-min YouTube build using cherry hardwood | Advanced woodworkers | Free |
| Woodsmith Plans (via Woodpeckers) | Premium shop drawings & exploded views | Pro-grade accuracy | Few bucks for downloading |
🎯 Quick Start Starter Pack
- Download the Lori Beds free plan (no pistons).
- Order a Create-A-Bed hardware kit on Amazon ($299) if you want gas-spring lift.
- Watch DIY Pete’s 20-min video once before you cut a single board.
Build once, fold forever.
How often should I tighten the bolts on my Murphy bed?
🔧 How Often Should I Tighten the Bolts on My Murphy Bed?
Keep it simple: every 3 months or any time the bed feels wobbly or sounds squeaky—whichever comes first.
Quick Schedule
- Quarterly (every 90 days)
Grab a socket wrench and give every piston bolt, hinge screw, and wall bracket a ¼-turn snug-up . - After heavy use (family visits, Airbnb turnovers)
Guests mean extra up-and-down cycles. Do a 60-second check once they leave. - If you hear a new rattle
Don’t wait—tighten on the spot. A bolt left untightened will gradually deform its mounting hole over time
30-Second Spot Check List
- 🔍 Piston arms (where the lift meets the side rails)
- 🔍 Wall lag bolts (top and bottom brackets into studs)
- 🔍 Leg pivot screws (if your bed has fold-down legs)
Use a hand-tight plus ⅛-turn rule: snug, but don’t over-torque and strip the threads. A drop of blue Loctite on wall bolts keeps them from backing out between seasons.
Bottom line: calendar reminder every season + an after-guest once-over keeps your Murphy bed rock-solid for years.
What if I don’t want to use pistons for my DIY Murphy bed?
🙅♂️ No Pistons? No Problem—Three Piston-Free Murphy Bed Options
If you’d rather skip the gas struts (or just hate the price tag), here are proven ways to get a smooth fold-up without them.
1️⃣ The Lori / YouLift “Human-Powered” Frame
- How it works
The system pairs a minimal-weight plywood platform with your choice of securement: locking pins for rapid disassembly or sliding bolts for permanent stability. You and a partner lift/lower by hand; gravity + counter-weighted legs do the rest. - Pros
• No hardware kit to buy (~$120 saved)
• Works with mattresses up to 12″ thick & 1,000 lbs total - Cons
• Requires two people for the first 6–8 lifts until muscle memory kicks in - Where to get plans
Free PDFs at loribeds.com or Instructables “DIY Modern Murphy Bed”
2️⃣ Torsion-Bar / Counter-Balance Hinges
- How it works
Replace pistons with a steel torsion bar hidden inside the side rails. The bar twists as the bed lowers and springs back to help lift. - Pros
• Whisper-quiet, no yearly re-pressurizing
• Rated for 15-year cycles - Cons
• Slightly bulkier side rails (adds ¾”) - Where to buy
Rockler Woodworking “Torsion-Assist Murphy Hardware” (~$189)
3️⃣ Old-School Spring Hinges (Budget Route)
- How it works
Heavy-duty screen-door springs or garage-door torsion springs bolt to the wall plate and frame. Adjust tension by moving the hook position. - Pros
• Parts cost < $30 at any hardware store - Cons
• Needs precise tension math—too loose = bed slams, too tight = won’t stay down - Pro tip
Use dual springs rated for at least 50 lbs each and always install safety cables inside the coils.
🛠️ Quick-Start Checklist for Piston-Free Builds
- Pick a weight limit: 1,000 lbs total (mattress + sleepers) max for Lori/YouLift style.
- You can Easily Download the free Lori vertical plan—it lists exact board cuts as well as bolt sizes.
- Grab two helper clamps when you dry-fit; the first lift is always the heaviest.
- Add rubber doorstops on the floor as a fail-safe catch if a spring ever slips.
Skip the pistons, save the cash, and still fold like a pro.
What’s the maximum weight capacity for the torsion-bar hinges?
⚙️ Maximum Weight Capacity for Torsion-Bar Hinges
(used in piston-free Murphy beds)
| Hardware Source | Rated Load (per pair) | Application Notes |
| Rockler Lid-Stay Torsion Hinge Set | 60–250 lb total door/lid (15–60 in-lb models) | Combine 2–4 hinges to match bed weight |
| Weber Knapp Counterbalance Hinges | Up to 200 lb panel | Industrial-grade, adjustable torque |
| Southco CB Series | 200–500 lb door | Feels like 5–10 lb when opening |
| Murphy-specific DIY kits (e.g., Create-A-Bed Torsion Kit) | 600–1,000 lb bed + mattress | Designed for queen/king beds |
🎯 Rule of Thumb
- Queen-size bed + mattress ≈ 80–120 lb
- Use two 250 lb-rated torsion hinges for a 2× safety factor.
- Always check the manufacturer’s torque chart (in-lb or N·m) and match center-of-gravity distance of your bed frame.
If your build exceeds 1,000 lb total, step up to heavy-duty counterbalance hinges or dual torsion bars.
How do I calculate the required torque for my bed?
(Bed Torque Calculation Formula)
⚡ How to Calculate the Required Torque for Your DIY Murphy Bed
You don’t need an engineering degree—just five minutes and a tape measure.
1️⃣ The Simple Formula
Torque = Weight × Distance
Where:
- Weight = total weight of bed frame + mattress + bedding in pounds (lbs)
- Distance = “Distance refers to the horizontal span (ft) from the rotational axis to the weight’s central point.”
2️⃣ Step-by-Step Example
| Step | What to Measure | Typical Queen Values |
| a. Weigh the bed | Frame + mattress + sheets | 160 lbs |
| b. Find the center of gravity | Measure from pivot to mid-mattress | 3.5 ft |
| c. Plug in | Torque = 160 × 3.5 | 560 lb-ft |
3️⃣ Match Hardware to the Number
- Torsion bars are sold in 100–1,000 lb-ft increments in pairs.
- Rule of thumb: choose a pair rated 2–2.5× your calculated torque for smooth, one-hand operation.
Example: 560 lb-ft → pick 1,100 lb-ft torsion pair.
4️⃣ Quick Sanity Check
- If the bed drops like a rock → hardware is under-rated.
- If it takes two people to lift → hardware is over-rated or pre-load is too high.
That’s it—measure once, buy once, fold forever.
How do I measure the distance accurately?
📏 Measuring “Distance” for Torque Calculation – A 3-Minute Pro Method
You only need a tape measure and a helper (or a couple of clamps and a level).
1️⃣ Find the Pivot Axis
- Establish reference marks at the precise midpoint of each hinge pin’s mounting location.
- That line is your zero-point.
2️⃣ Locate the Center of Gravity (CG)
- With mattress on the frame, slide a long 2×4 under the bed until it balances on the edge of the frame.
- This marked balance position establishes the exact lengthwise center of gravity.
3️⃣ Measure Horizontal Distance
- Measure straight out from the pivot axis to the CG mark while the bed is horizontal (fully open).
- Keep the tape perpendicular to the wall—a cheap level across the tape prevents tilt errors.
4️⃣ Double-Check
- Repeat on the other side; the two numbers should be within ½”.
- Average them to cancel any slight frame twist.
Pro tip: If the bed feels nose-heavy after you install the torsion bars, re-measure with bedding—a thick comforter can move the CG another 2–3 inches.